
A lot of automated testers spend much time searching for some part of the web page such as the Search button, group of information entry fields, or particular program blocks. The search process can be a difficult task, especially when a web object doesn’t have an original ID or class.
Below, you can find a short but comprehensive manual on how quickly one can find web elements on a page during the automated software testing.
Web elements and others
Concept of Web Element
So, the web element is an original component inside the web page structure that is generated in front-end when a user opens a web page, for example.
In the HTML structures, all the components are defined through tags, classes, attributes, or content. They also can have child elements such as tables. If you use CSS, you can change, hide, or make elements’ content and display.
Moreover, all modern programming languages interact with web elements through DOM.
What Are the Locators of Web Elements?
It is worth remembering that web elements and locators are completely different things. The locator of the web element is a special object that can find elements upon request. In other words, locators can help you to find any web element.
In the test automation sphere, locators allow interacting with software structure at the programming layer: at first, encrypted search suggestion is made, and then on its basis users can work on some web element.
No automated product can examine a web page as a real person can. Instead of this, it will try to search with DOM.
How to Find Elements?
If you use classic locators for automated tests, then it will be really hard to find elements. To simplify this process, one can use DevTools of the browser (Chrome or Mozilla Firefox) and some IDE.
Further, we’ll analyze the examples of the tests based on Google Chrome usage.
You can explore the web page after you right-click the necessary web element (or press F12).
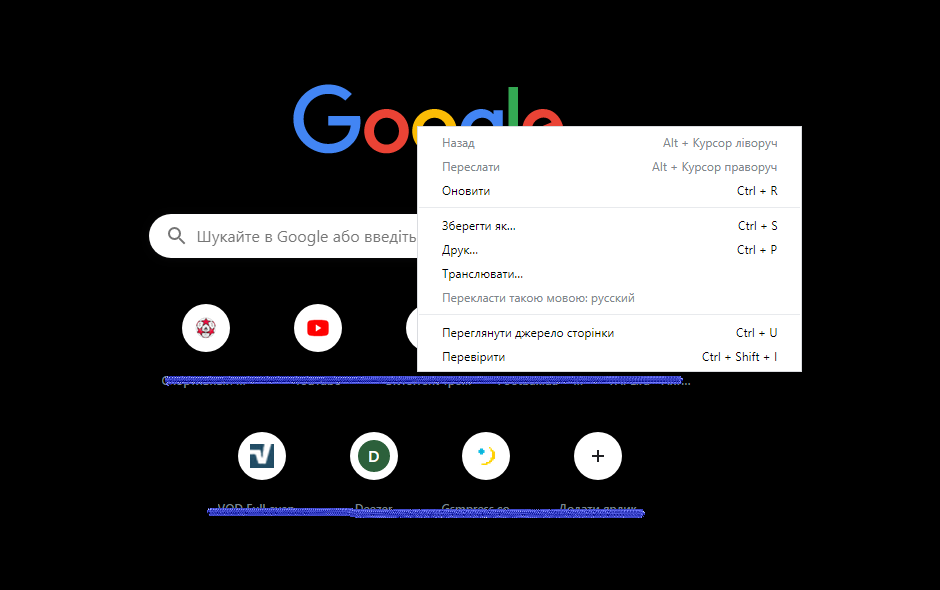
Web elements search in Google Chrome
In order to select some elements, you have to go to the Elements tab. Then you click (technically, it’s the Select tab) and place the mouse cursor on the needed visible element. After you click on it, the selected element will be highlighted in the Elements tab.
And that’s it. Now you can examine necessary class, tag, or attribute (parent and child elements).
A Formula of Qualitative Locators
Finding locators is only half of the process if we’re talking about test automation. The development of an original request for a locator is quite an important but complicated thing. If the locator value is extensive enough, it will give wrong positive parameters.
In this case, a good practice will be to make an ordinary request that can qualitatively identify a basic element or group of elements.
You can take into account the following request types with their decrease:
- Identifier;
- Name;
- Class name;
- CSS selector;
- Xpath without a text;
- URL text;
- Xpath with a text.
Original identifiers and class names allow simplifying the development of locators: all the next requests will be short, and there will be no need in an additional anchor.
In this case, you should always ask programmers to create an original ID for all the web elements. But sometimes it can happen that testers get software which elements don’t have a unique ID. Then locators have to rely on difficult CSS selectors and Xpath.
If such a situation happens on your project, you should make use of the following recommendations:
- Use the parent web elements like anchors, if they have original ID;
- Avoid Xpath with text;
- Apply the contains options when you examine the classes in Xpath.
You should always check the locators as there can be composition errors and wrong positive parameters. In the context of Google Chrome functionality, locator testing comes to simple Ctrl+F click on the element tab. DevTools will show all the needed elements first in first out.
Nevertheless, sometimes the locator isn’t activated in the test. Then you can do the following:
- Run the test without debugging with a personal IDE;
- Set a breakpoint on the locator;
- Wait till tests are completed;
- Go to DevTools in the active Chrome window;
- Check the DOM and run the locator test on the page.
What to Do If Locators Are Unstable?
People are used to criticizing testing with UI since sometimes these tests are failed for some unknown reason. Mostly, this instability is connected with the fact that any web interaction makes racing conditions.
The automation process and web browser work separately, and test interaction should be synchronized with the current condition of the page. Otherwise, WebDriver will show exclusions because of timeouts and undetected elements.
The most effective way to avoid such situations is to wait for the correct element state before start working with it. Despite the fact it sounds simple, some testers often forget about it.
Selenium WebDriver parameters consist of many components, for example, WebDriverWait that can make the driver wait for the correct level before the next conditions.
To sum up, we would like to notice that automated testing is based on multifunctional actions which are followed by peculiarities of web elements performance. Correct methods of test automation allow providing the services quickly and qualitatively.


Leave A Comment