
Cypress is a very interesting and popular tool, considered to be really cutting-edge software in the QA field and meeting today’s needs.
Cypress is a great JavaScript tool (an available framework).
It shows its power right from the minute it has been installed, you can easily create and integrate simple and clear tests in it, so even junior automated testers can easily learn it.So what is the right way of using such software to deliver efficient and useful automated tests?
Process of creation

Cypress Tool
Let’s imagine that we have already installed everything. Let’s move on.
- First, you need to create a folder for a test project, then open VSCode and apply cd your/project/path command. This is necessary for changing an active folder to a test one (for a project);
- Not mandatory but highly recommended is creating a group of project folders with a basic file to interact with npm packages;
- After this, a console can ask a user some optional questions but they can be easily skipped. Then a project folder will contain a .json file with detailed reports on your answers to the questions, all created scripts, and a list of packages — it must be empty. You should change this;
- Now it’s time to launch Cypress. Users see it as a package but npm will help you to easily install it on a test project. It’s not hard, you just need to use a simple command: npm install cypress –dev;
- The command is quite clear (except for the last part). –Dev flag means that the software should be only with dev dependence. In other words, it’s needed only for the installation. Installation without this flag will result in seeing the requirements to install the package only for launching. Right after entering this command, a user can just look at the text that will be displayed in a console — the installation process will last just a few minutes.
- When the installation is finished, a node_modules folder will be created in a project folder and it will be empty until you start creating the tests;
- A command to initialize Cypress — npx cypress open. After entering it, a user receives a line of text in a console that means that you run the software for a product-in-test for the first time. It will disappear right after configuring some options and when this process is ready, you will be able to start working with Cypress. A user will see a powerful dashboard, a tested project will comprise new folders and files to work with.
First, let’s analyze the contents of a Cypress folder.
It comprises the following parts:
- cypress/fixtures;
- cypress/integration;
- cypress/plugins;
- cypress/support.
A root folder contains configuration files — foldername/cypress.json.
An integration folder will permanently contain all your tests. You can create new folders inside it if there is such a need, to build tests in the way a user wishes but all tests must be always located inside this folder.
Cypress will automatically take all .js files from this folder and move them to a dashboard. If a user tries to launch Cypress CLI, all tests will be automatically taken if you have not launched them and have not used your personal (custom) commands.
All data are saved in JSON format in the Fixtures folder. This can be either answers to queries or special data that should be also saved in JSON format.
Now lets’ talk about the correct way to create a test file in Cypress.
An example of Cypress test
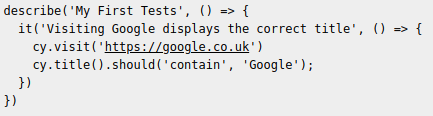 This structure will definitely seem quite complex. But this is just the way all tests look like in Cypress.
If you are not proficient in JS testing, then such words as describe and it can be new to you. But if a user is familiar with them, then he/she has experience with the Mocha framework which can be used for writing and editing completely clear tests. Describe and it are simply names of the tests in a specification manner that gives the possibility to use general English and not the names of methods that are used in C# and NUnit.
Describe is the name of a test specification or a test suite. It is the name of a test inside a list of a test suite and here you can also use general language to describe a test.
Inside the above-mentioned test, you can easily see that all test steps start from the word cy. In the same way, as in Selenium where users constantly use the word driver, they use cy in Cypress.
All test steps are quite simple but we should mention that Cypress records all user actions and automatically saves all changes.
If you click twice on a test file, you’ll see a new window — it’s some kind of Cypress browser that automatically launches a test. It will rapidly close, not starting completely and you’ll see a beautiful green color that will indicate that the test has been successful.
Conclusion
It’s definitely a very brief introduction to Cypress and we have analyzed the most complex configurations that are needed to configure the software to perform complete integration testing.


Leave A Comment